Contents
Blogger is an awesome free tool to quickly start blogging. However, many Blogger users eventually realize that if they want full control of their blog, then they would be better off with their own self-hosted WordPress.org blog.
Many bloggers are afraid of migrating blogger to WordPress. They are afraid to lose blog post they wrote and published, images they have added, keyword ranking they achieved, PageRank, and few more thing.
Here you will know how to migrate from Blogger to WordPress step by step:
Before Starting migration from Blogger to WordPress you should take back up of your blogger blog.
How to Export and Back up a blog?
Step 1: Login to Blogger and Move to Setting Tab.

Step 2: Click on Other
Step 3: Select Back up content and then save it to your computer.


Your Blogger’s Blog content will be downloaded in XML file format in the computer.
Before starting with WordPress you will need a good hosting company and your own domain name. Blue host is officially recommended hosting providers of WordPress.
Once you have signed up for WordPress hosting and set up your domain name, the next step is to install WordPress on your hosting account. Once you have installed WordPress, it is time to move your content from Blogger to WordPress.
Step 1: After taking your blogger content back up in the XML file, download it and save it to your computer. Now it’s time to import it into your WordPress site.
Step 2: Import Blogger to WordPress

To start importing your Blogger site into WordPress, you need to go to your WordPress admin and visit Tools » Import. On the Import page, click on Blogger.
A pop up will appear on your screen asking to install Blogger to WordPress Importer. Tap on Install Button.
WordPress will now download and install the Blogger Importer plugin for you. Once it is finished installing, you would need to click on the Activate Plugin and Run Importer link to continue.

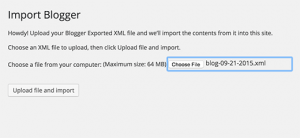
On Blogger Importer screen, WordPress will ask you to upload the XML file. The file which you have downloaded at the time of taking back up from blogger.
Simply click and choose the file and click on Upload file and Import.

WordPress will now import your blogger posts one by one. When it is finished, you will be asked to assign an author to the imported posts. You can assign your blogger posts to yourself or create a new author account.
You have successfully imported your Blogger content into WordPress. However, you still need to make sure that you don’t lose any search rankings and that visitors from your old blog easily land to the same content on your new WordPress website.
Step 3: Setting Up Permalinks:
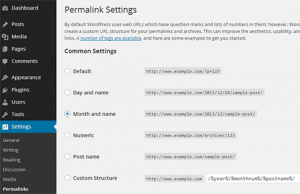
Permalinks are the term used for URL structure of Individual pages. Since you are importing from Blogger then you would want your URL structure same as the blogger for your WordPress.
For setting permalinks to follow the steps. Go to setting—Permalinks screen and choose Month and Name as your Permalink structure.

Step 4: Setup Redirects in WordPress File:
Over here, you will require making changes in theme’s “functions.php” file. Most of the WordPress themes contain functions.php file. But be sure you must take backup of this file before you make any changes to it.
- Open your WordPress dashboard.
- Navigate to Appearance —- Editor.
- Open “PHP” file
- Copy and Paste the below code at the very first line of “functions.php”.
- function blogger_query_vars_filter( $vars ) {
- $vars[] = “blogger”;
- return $vars;
- }
- add_filter(‘query_vars’, ‘blogger_query_vars_filter’);
- function blogger_template_redirect() {
- global $wp_query;
- $blogger = $wp_query->query_vars[‘blogger’];
- if ( isset ( $blogger ) ) {
- wp_redirect( get_wordpress_url ( $blogger ) , 301 );
- exit;
- }
- }
- add_action( ‘template_redirect’, ‘blogger_template_redirect’ );
- function get_wordpress_url($blogger) {
- if ( preg_match(‘@^(?:https?://)?([^/]+)(.*)@i’, $blogger, $url_parts) ) {
- $query = new WP_Query (
- array ( “meta_key” => “blogger_permalink”, “meta_value” => $url_parts[2] ) );
- if ($query->have_posts()) {
- $query->the_post();
- $url = get_permalink();
- }
- wp_reset_postdata();
- }
- return $url ? $url : home_url();
- }
Step 4: Setup Redirect in Blogger:
- Login to Blogger.com
- Navigate to “Theme”
- Click on Revert to Classic Theme.
Once you revert to the classic theme, you will find “Edit Theme HTML”.
Replace all lines under “Edit Theme HTML” with Following HTML code.
- <html>
- <head>
- <title><$BlogPageTitle$></title>
- <script>
- <MainOrArchivePage>
- location.href=”http://example.com/”
- </MainOrArchivePage>
- <Blogger>
- <ItemPage>
- location.href=”http://example.com/?blogger=<$BlogItemPermalinkURL$>”
- </ItemPage>
- </Blogger>
- </script>
- <MainPage>
- <link rel=”canonical” href=”http://example.com/” />
- </MainPage>
- <Blogger>
- <ItemPage>
- <link rel=”canonical” href=”http://example.com/?blogger=<$BlogItemPermalinkURL$>” />
- </ItemPage>
- </Blogger>
- </head>
- <body>
- <MainOrArchivePage>
- <h1><a href=”http://example.com/”><$BlogTitle$></a></h1>
- </MainOrArchivePage>
- <Blogger>
- <ItemPage>
- <h1><a href=”http://example.com/?blogger=<$BlogItemPermalinkURL$>”><$BlogItemTitle$></a></h1>
- <$BlogItemBody$>
- </ItemPage>
- </Blogger>
- </body>
- </html>
**” example.com” it should be your domain name.
Step 5: Redirect Blogger Feed to WordPress Feed:
- Navigate to Setting → Other in Blogger Dashboard.
- Under site feed, click on “Add” link next to “Post Feed Redirect URL”.
- Add WordPress feed URL like http://www.example.com/feed

- After this Save Settings.
Read : 6 Things to Consider Before Buying Expired Domains.
Step 6: Import Blogger Images to WordPress Media Library:
The final step for Blogger to WordPress is How to Import Blogger images to WordPress Media Library files. To complete this process, you will need a Plugin name “Import External Images”
Step 1: Download “Import External Images”
Step 2: Open WordPress dashboard move to Plugin and Add New.
Step 3: Click on Upload Plugin and upload downloaded plugin file.
Step 4: Activate Plugin
Step 5: Navigate to Media and Import Images
Step 6: Over here you will find all posts those have external images to import.
Step 7: Select all and Import all Images
Conclusion:
Note: Do not delete your Blogger’s Blog. This will help you to prevent from data loss and you can keep one copy of your blog with you.
I hope, all above-mentioned process is easy to follow, and you have successfully migrated your blog from Blogger to WordPress.


