

Contents
Want to import the .docx document in WordPress instead of copying/pasting which usually messes up the formatting?
And another reason is that some bloggers prefer to write their blog posts in MS Word because it offers impressive graphics capabilities, built-in spell check, templates, thesaurus, styles, formatting, and lot more features. While in the default WordPress editor all these features are not provided.
WordPress:
It is a super-popular, open-source blogging platform that’s designed to be flexible, customizable and user-friendly. It is also very easy to use with Microsoft Word.
If you haven’t already set up a WordPress blog, you can do it in just a few minutes. Just visit WordPress.com, pick a URL that’s not taken yet, and fill in some basic personal info. WordPress will try to upsell you to the $25-per-year hosting, but if you decline you’ll still have unlimited free hosting and a “[something]. wordpress.com” domain name.
You’ll be asked to pick a theme for your site, connect a social media account, and write an introductory post. You can skip the latter two steps and go back to change any of this stuff at a later time.

You can also download and install WordPress on almost any web host. Many hosts have scripts that handle the setup for you, but you can always visit WordPress.org to download a copy of the software.
To Enable XML-RPC in WordPress you will need to enable remote publishing in WordPress. But due to some restriction and security in WordPress, it is disabled for that you have to install a plugin.
Follow the steps to install the plugin:
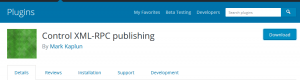
Step 1) Install WordPress plugin Control XML-RPC Publishing and Activate it.
Step 2) Move ahead to Settings and Tap on Writing.
Step 3) At the page of Writing Settings scroll all the way down and find the option of the Remote Publishing.
Step 4) Enable the Option and click on Save.
Step-by-Step Guide for Publishing to WordPress with Word:
Step 1) If you have not yet registered your blog account with Word, the Register a Blog Account dialog box appears. Do one of the following:
- Click Register Now if you want to link Word with a blog service provider. Go to Register a blog account to finish this process.
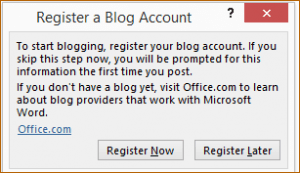
- Click Register Later if you only want to write a post and do not want to register an account at this time. Go to Add content to a post to continue writing your post.
Step 2) You can choose the platform that you are using for your blog. Choose WordPress and then click on Next button.

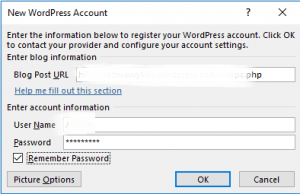
Step 3) Now you have to Enter your Blog URL. This will help MS Word to know where to post your Blog content.
Step 4) Next Step is to Enter your User Name and Password in login field and Check the Remember Me checkbox and Click on OK Button.
Blogging gives you the power of publishing without relying on media outlet channels or traditional print publications. This article shows how to write blog entries in Microsoft Office Word and then send them directly to selected online blog sites.
1) Choose a Blog Publishing Service:
- SharePoint blog
To create a blog, you must have permission to create sites. For more information, see your site manager or administrator. - Telligent Community (Community Server)
Follow the instructions on the home page to buy your own hosted community site. The service is available at different prices for different levels of service. - WordPress
Word supports blogs on WordPress.com (a free service), as well as blogs on a custom WordPress site. For a blog on WordPress.com, follow the instructions on the home page to create your own space. For a blog on a custom WordPress site, ask your site manager for help on how to set up a blog page. - Type Pad
Follow the instructions on the home page to buy your own hosted blog site, including features that make a design, posting, web integration, and community management easier. The service is available at different prices for different levels of service.
2) Start a Blog Post:
The easiest way to blog from Microsoft Office Word is to use the Blog post template when you start a new document. Word walks you through the one-time setup process so that you can publish documents as blog posts.
- In Word 2010, Word 2013, and Word 2016, select File > New > Blog post.
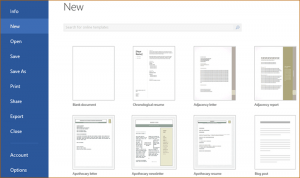
In Word 2007, click the Microsoft Office Button, and then click New. In the New Document window, click New Blog Post.
Read : How To Improve Your Blog in 2017
3) Add Content to Post:
The window that appears when you select the Blog Post template normally has two tabs: Blog Post and Insert. When Blog Post is selected, you can use tools for working with your blog, working with the clipboard, entering basic text, applying styles. When the Insert tab is selected, you can add photos, hyperlinks, and other items to your post.
- Type a title for your post at the top of the document where indicated.
- Click on the title to begin entering the text for the body of your post.
- To publish your blog post, click Publish.
- To post a draft of your blog post so that you can preview it before it goes live, select Publish > Publish as Draft.
4) Edit existing Blog Post:
You can save your entries as Word files on your computer and then edit them later.
- On the Blog Post tab, click the Open Existing button to see a list of all of your posts.
- Click the title for the post you want to edit and then click OK.
Conclusion:
This is the detailed guide that will help you to directly publish your blog posts from Microsoft word to your WordPress site. Word processors don’t make the best web publishing tools. If you insist on using one for your content creation process, the tips in this article should help you import documents into WordPress without breaking a sweat.